How to run a Globalping probe on DigitalOcean using Docker

Globalping uses a vast probe network distributed across the globe to allow anyone to run network commands like ping, traceroute, or dig form anywhere.
We rely on the Globalping community to host these probes, making the network more robust and providing more accurate results while earning credits that allow them to run even more measurements. Currently, there are over 1000 active probes, mostly running inside Docker containers in homes, offices, and cloud servers of private users and companies.
In this guide, we'll walk you through hosting your own probe on DigitalOcean using Docker. We'll cover setting up a Droplet with Docker, running the probe, connecting it to the Globalping dashboard, and creating your first network measurement on your new probe.
Prerequisites
Before we start, make sure you have the following:
- A DigitalOcean account
- Basic knowledge of SSH and Docker is nice but not required
Setting up a probe with Docker on DigitalOcean
The very first step for us is to create a new Droplet with Docker to run the Globalping probe.
Step 1 – Creating a Droplet with Docker
Instead of installing Docker manually, we can use the Docker 1-Click App to create a new Droplet with Docker already installed.
- Go to the Docker 1-Click App page in the DigitalOcean Marketplace
- Click the "Create Docker Droplet" button on the right to start the Droplet setup process
You can configure your Droplet as you like – here are some tips to help you:
- Region & Datacenter: Pick any location you like. Just keep in mind that the datacenter region will be the location of your probe!
- Image: Double-check that the Docker image is selected under the "Marketplace" tab.

- Size: We recommend a plan with at least 1GB of RAM to run Docker.
Tip: Automated probe installation
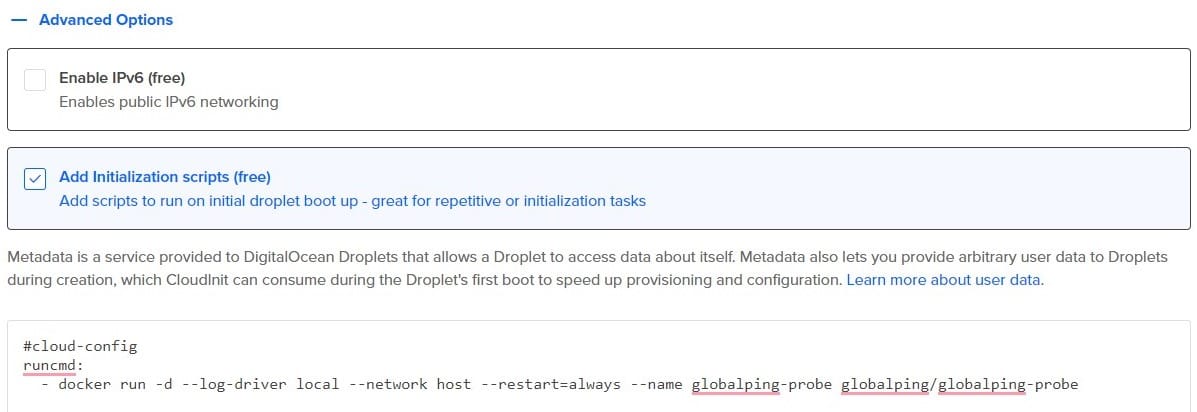
When setting up the Droplet, we can add an initialization script that we want to use to pull and run the Globalping probe container automatically.
- Under "Choose Authentication Method" toggle the “Advanced Options” and tick the box for "Add initialization scripts"
- Paste the following command into the text box:
#cloud-config
runcmd:
  - docker run -d --log-driver local --network host --restart=always --name globalping-probe globalping/globalping-probe

When you're happy with your settings, click "Create Droplet" and wait until it's created. You also need to give the Droplet a minute or two to set up Docker and start the Globalping probe.
Step 2 – Checking your setup
Next, we recommend you log into your Droplet to see if the Globalping probe’s running.
- SSH into your Droplet:
ssh root@your_server_ip
Replace your_server_ip with the IP address of your Droplet (you can find it in your DigitalOcean dashboard).
- Check if the container is running:
docker ps
- You should see your Globalping probe in the list:

If you can’t see the container, you can pull and start the probe manually with this Docker command:
docker run -d --log-driver local --network host --restart=always --name globalping-probe globalping/globalping-probe
You're now hosting a Globalping probe on DigitalOcean and are officially part of the community – welcome!
Step 3 – Updating the probe (Optional)
As soon as new versions are available, the probe automatically updates itself. However, the Docker container does not update on its own. That's why we recommend that you manually update the container regularly.
To update the container, SSH into your Droplet and run the following:
docker pull globalping/globalping-probe
docker stop globalping-probe
docker rm globalping-probe
docker run -d --log-driver local --network host --restart=always --name globalping-probe globalping/globalping-probe
Step 4 – Learn more about the probe
You're probably curious to learn more about the probes, their limitations, and their security. You can find all this information in the probes' GitHub README.
Connecting a probe to the Globalping Dashboard
You can adopt all your probes from within the Globalping Dashboard. Although this is not required, we recommend doing so, especially if you run multiple probes or want to earn credits to increase rate limits.
Why connect to the Globalping Dashboard:
- Get an overview of all your probes and their current status.
- Assign custom tags to your probes to group and target them directly when running a network measurement with Globalping.
- Generate credits to increase rate limits, which is especially useful for power users for whom the free limits aren't enough.
Adopting your probe
First, head to the Globalping Dashboard and sign in with your GitHub account.
A quick tour of the dashboard
Here's what you can find in the dashboard:
- Overview: This page provides an overview of your probes, their status, and the credits you've generated.
- Probes: Here, you can get more details about all the probes connected to your account, whether they're running or inactive.
- Credits: See how many credits you've earned by hosting probes and how many you've spent
- Tokens: If you're using the Globalping API, tokens let you enjoy increased limits. Once you've reached the free limit, you can spend your credits to keep running measurements.
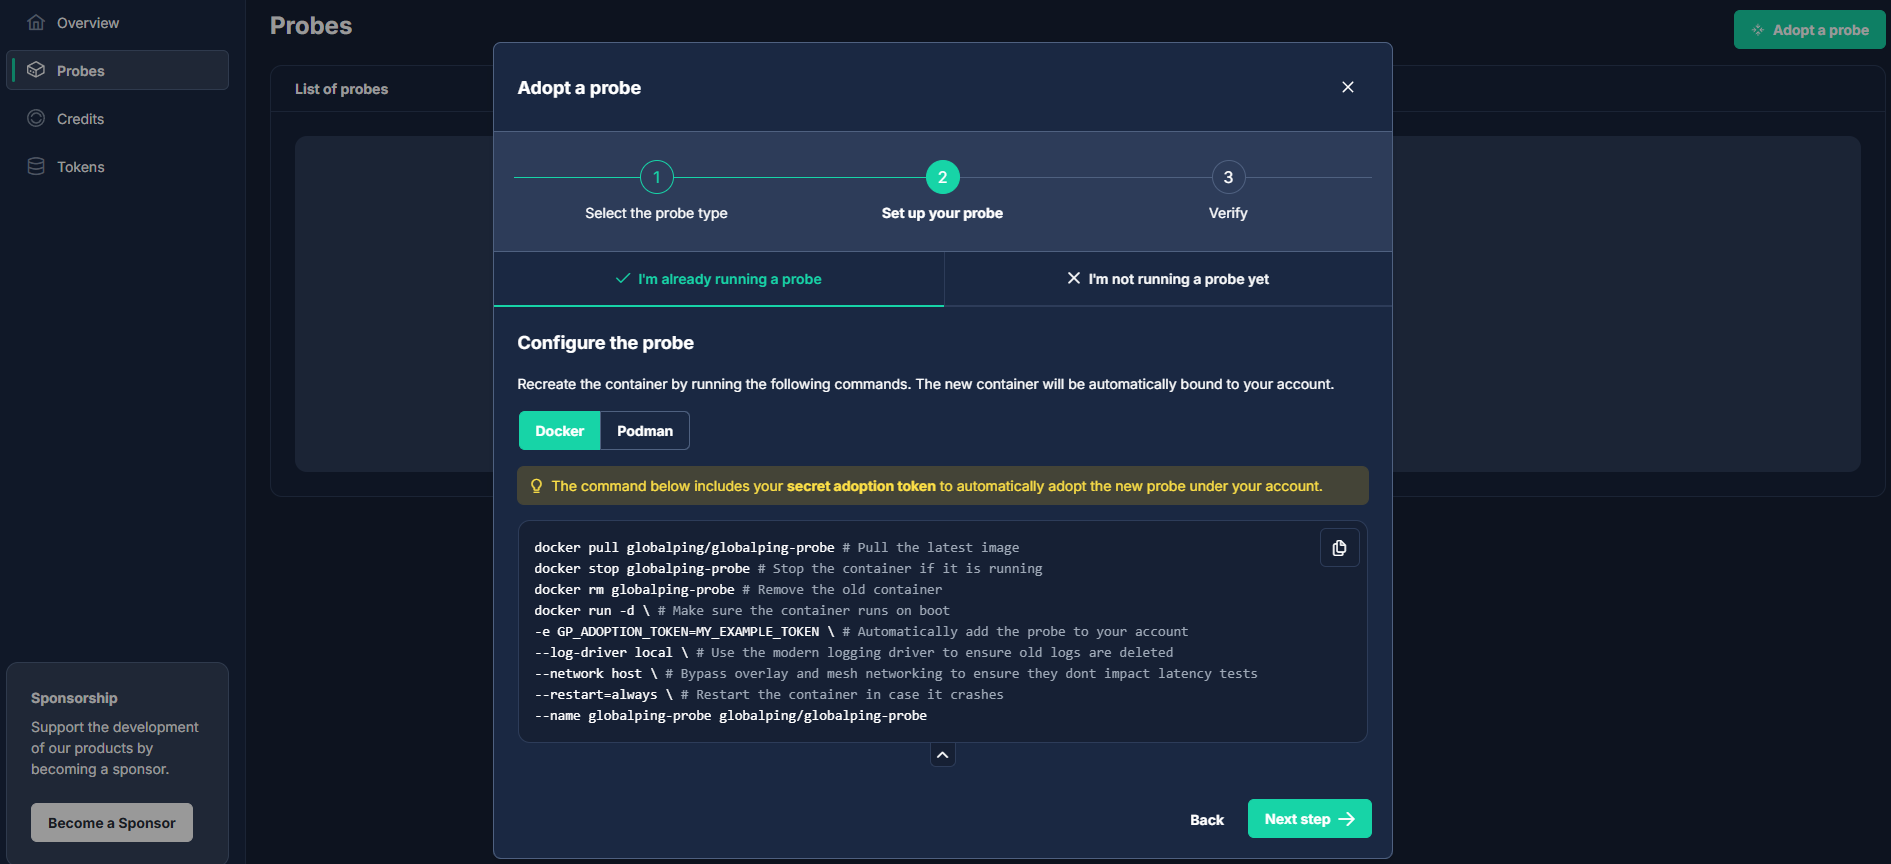
Connecting your probe
- Navigate to the "Probes" section and click "Adopt a probe"
- Select "I'm already running a probe"
- Copy the provided Docker commands, which recreate the container and adds the probe to your dashboard account via an adoption token

Once you've connected your probe, it should be visible on your dashboard!
Using custom tags and running a network test from your probe
Let's see your probe in action by running a network measurement from it!
Step 1 – Creating a custom tag
You can target specific probes on which to run measurements using tags. They are also handy if you want to group your probes. For example, you can assign the same tag to all your DigitalOcean probes, allowing you to run a test from all of them.
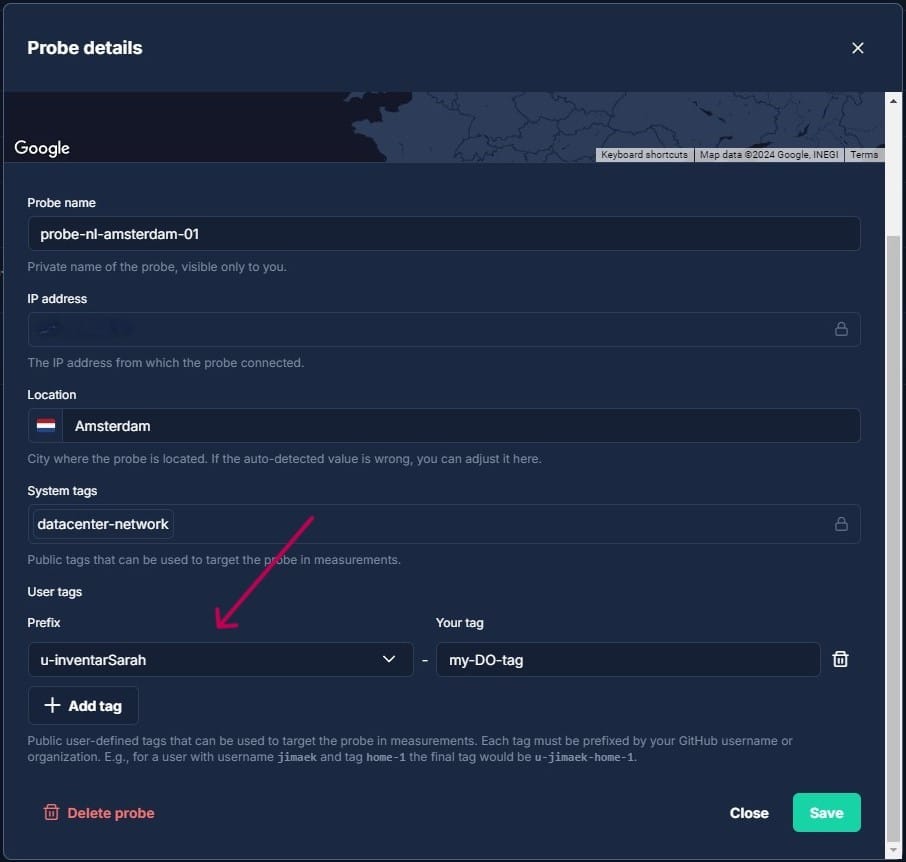
- Click on the probe in the dashboard to go to its details page
- Scroll to the tags section and click "Create a new tag"
- Give your tag a custom name. The prefix is auto-generated based on your GitHub username.

- Save your changes and view your probe in the dashboard to confirm that you’ve assigned the tag successfully:

datacenter-network, which the Globalping API assigned to your probe. Globalping uses various tags to allow users to target specific probes – you can find more information about this on GitHub.Step 2 – Running your first measurement
- Go to the Globalping website, where you can quickly run network measurements using the form at the top.
- Let's create a ping test with the target google.com (or whatever target you want)
- In the "Location" field, enter the custom tag you've assigned to your probe
- Set the limit to 1 (since you only want to run the test on your probe).
- Click the "Run test" button

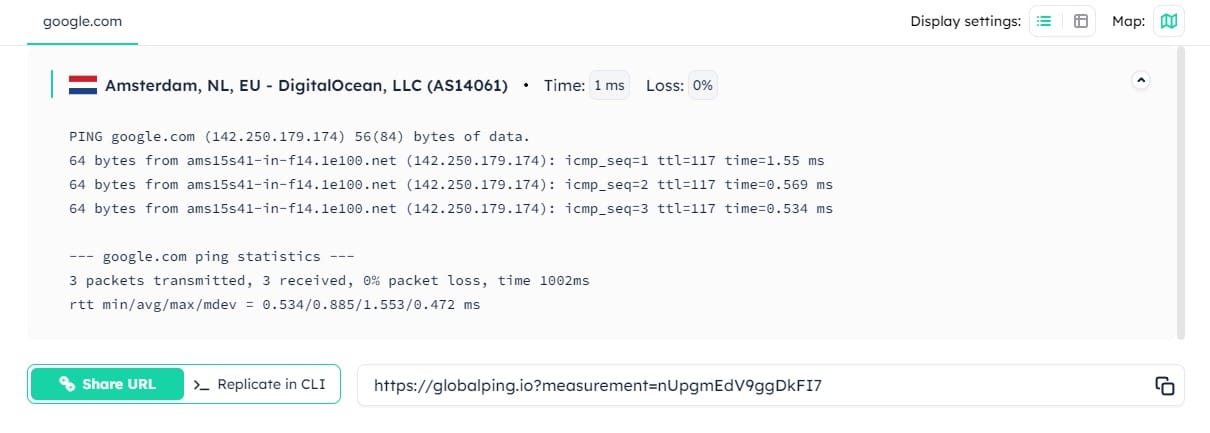
The results of your ping test are displayed below the map. The first line in bold contains details about the probe used: the location should match the one you selected for your Droplet (you should also see “DigitalOcean” on the same line).

Conclusion
By hosting a Globalping probe on DigitalOcean, you become part of the Globalping community. The platform relies on your contributions, enabling anyone on the internet to run network measurements from anywhere, free of charge!
In this guide, we've shown you how to set up a Globalping probe using Docker on a DigitalOcean Droplet, connect it to the Globalping Dashboard, and run your first network test from it.
Setting up a probe is a great way to give back and lets you earn credits to increase rate limits.
Ready to join the Globalping community? Set up your own probe and start contributing!