Global uptime monitoring with Uptime Kuma and Globalping
We’re happy to announce that you can now use Globalping as a native feature in Uptime Kuma. This allows users to optionally monitor their APIs and services from anywhere in the world, regardless of where they host Uptime Kuma.
In this blog post, we’ll show you how to use Globalping with Uptime Kuma for monitoring and how you can benefit from it.
Why monitor with Uptime Kuma and Globalping?
Before we get into the details, let’s briefly introduce you to the two tools:
- Uptime Kuma is a self-hosted monitoring tool with a modern UI and features for notifications, status pages, charts, configurable monitoring intervals, and more. You can quickly set it up on your server using Docker and start monitoring your APIs, websites, and other services with just a few clicks.
- Globalping is an open-source network measurement platform that can run commands such as ping, DNS lookup, and HTTP from virtually anywhere in the world via a vast probe network hosted by its community.
With a typical Uptime Kuma setup, you monitor from the location where the tool is running. So if it runs on a server in your home, it also runs its measurements from there. Now that Globalping is integrated, Uptime Kuma can offer you more than single-location monitoring: you can monitor from anywhere.
Why Uptime Kuma and Globalping are great together:
- Test availability from virtually anywhere in the world and define your monitoring location as broadly or as precisely as you need without deploying additional infrastructure. For example, you can monitor from a random probe in South America, Brazil, Rio de Janeiro, or specifically from a home network in Rio de Janeiro.
- Detect regional or ISP-specific outages that single-location monitoring would miss. If problems occur, Uptime Kuma can notify you, so you can quickly determine whether the issue is global or regional and troubleshoot the incident.
- Use ping with ICMP or TCP to test your services’ availability, or use HTTP requests (GET, HEAD, or OPTIONS) to confirm that your application responds correctly, or perform DNS lookups to verify name resolution. This makes it easy to adapt your monitoring setup to different services and environments.
- Combine a free, self-hosted monitoring tool with a global probe network that offers generous API rate limits that most users won’t reach. You can also increase the limit for free, as you will learn further down in this blog post.
Create your first Uptime Kuma monitor with Globalping
Let’s look at how to set up a new monitor in Uptime Kuma that uses Globalping to check the availability of a service.
For this, you’ll need a running instance of Uptime Kuma. Alternatively, you can try things out using the demo. Note, though, that the demo will automatically delete your user after 10 minutes.
- Log in to your Uptime Kuma dashboard and add a new monitor.
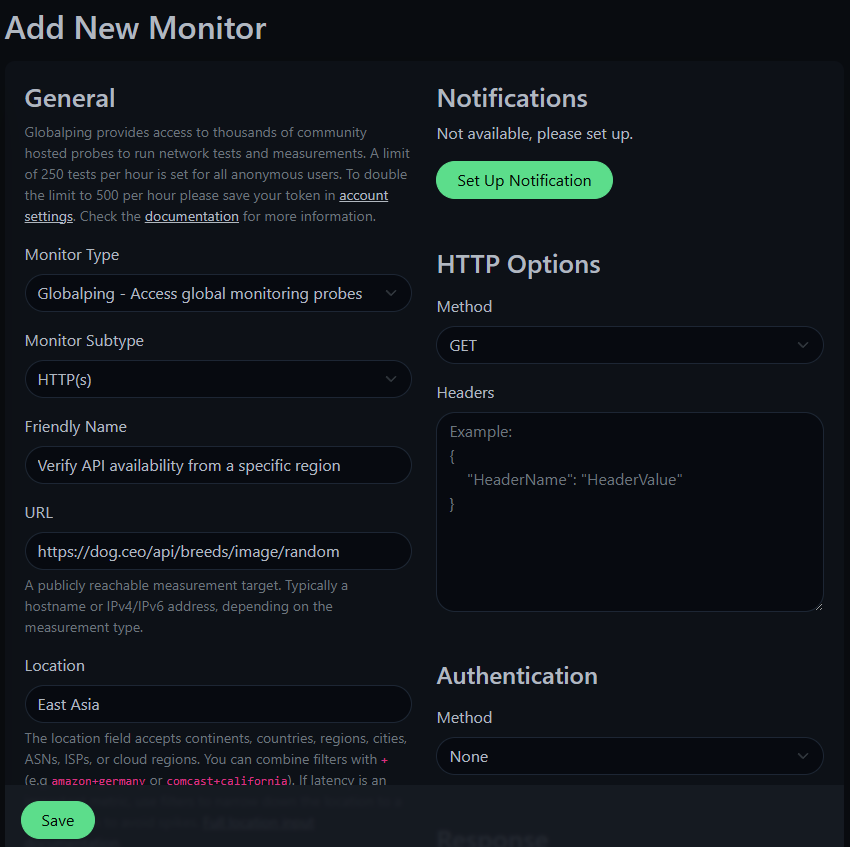
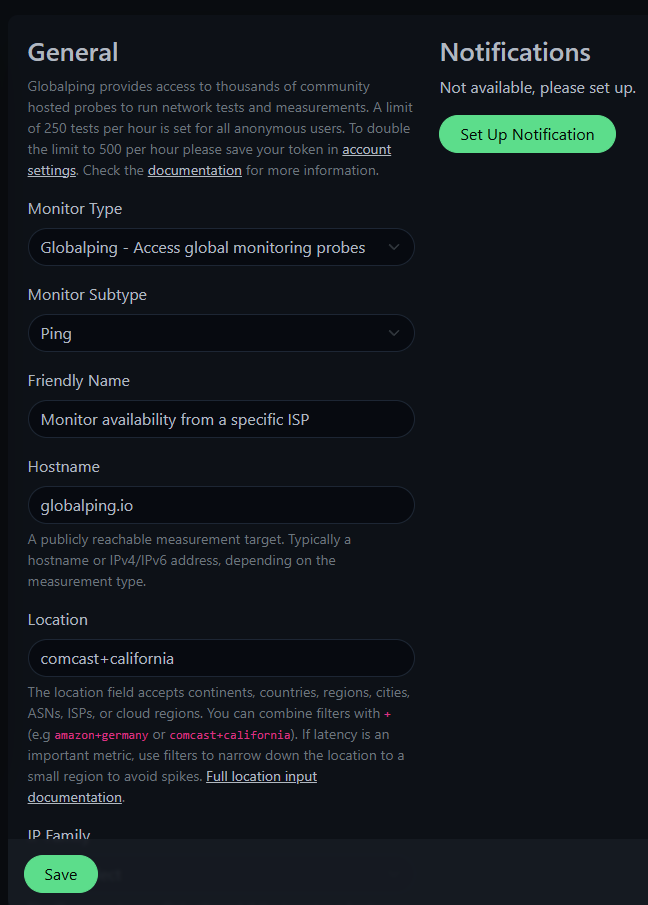
- In the monitor settings, click the “Monitor Type” dropdown, scroll down to the section named “Specific Monitor Type”, and select “Globalping - Access global monitoring probes”.
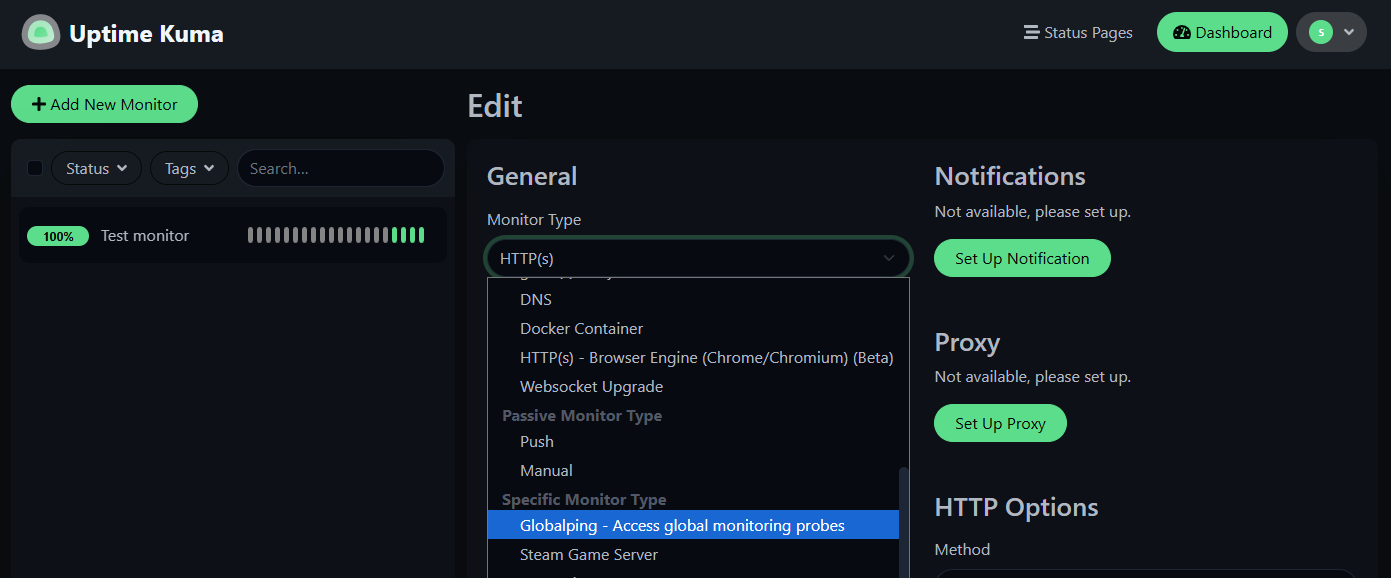
- This will present you with Globalping-specific configuration options:
- Monitor subtype: you can run ping, DNS, or HTTP tests; we’ll pick ping here.
- Hostname: your monitoring target; we’ll enter globalping.io
- Location: from where you want to monitor from; we’ll leave it at “world”, which will select a random probe from the network. We’ll experiment with this option more later.
- Depending on the selected subtype, you’ll also see additional options. For example, you can choose between ICMP and TCP for ping, configure HTTP request headers, or define the record type for DNS lookups. We’ll leave everything as is for this example.
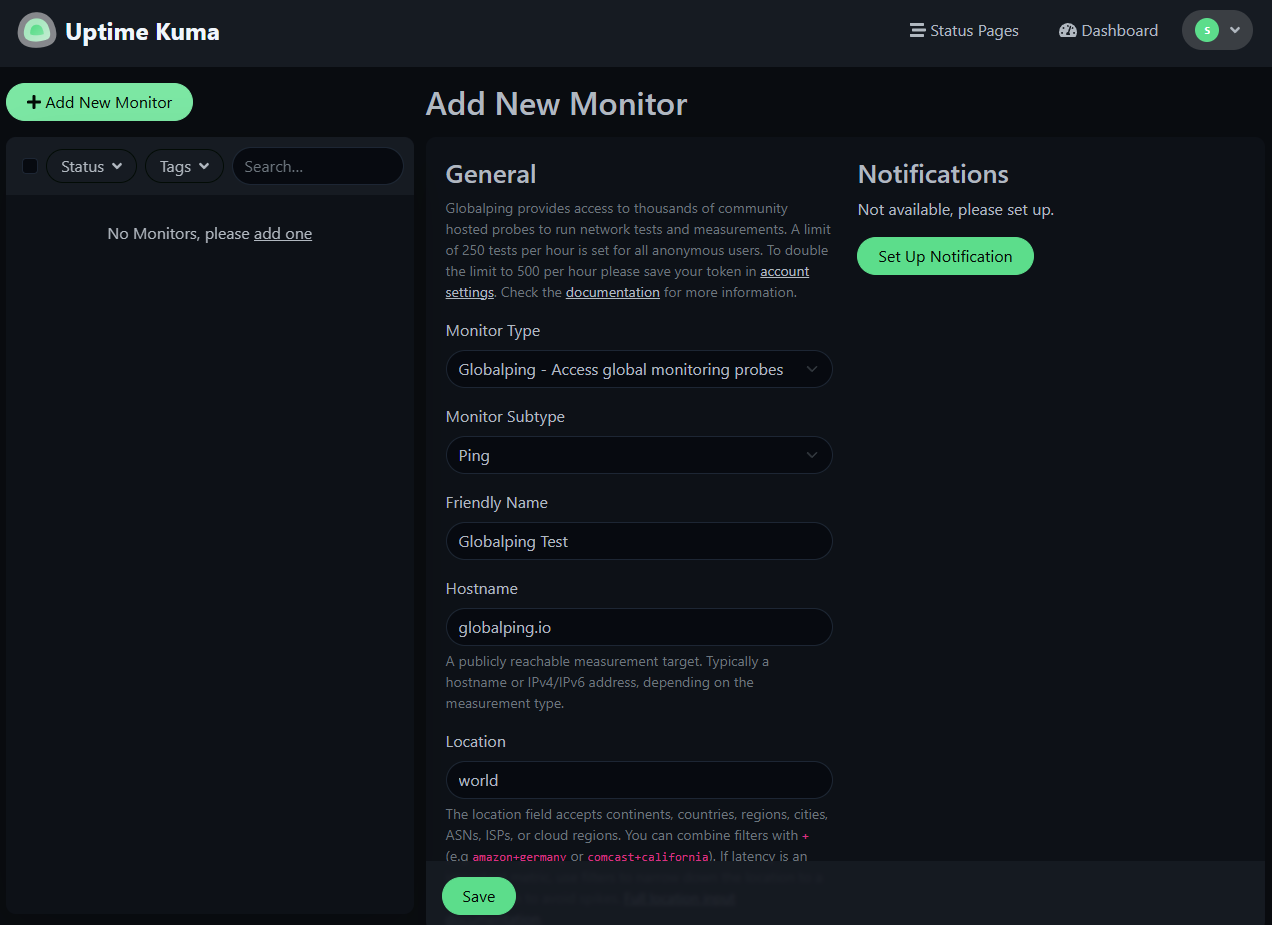
- Once you’re happy with your settings, click the save button, and that’s it!
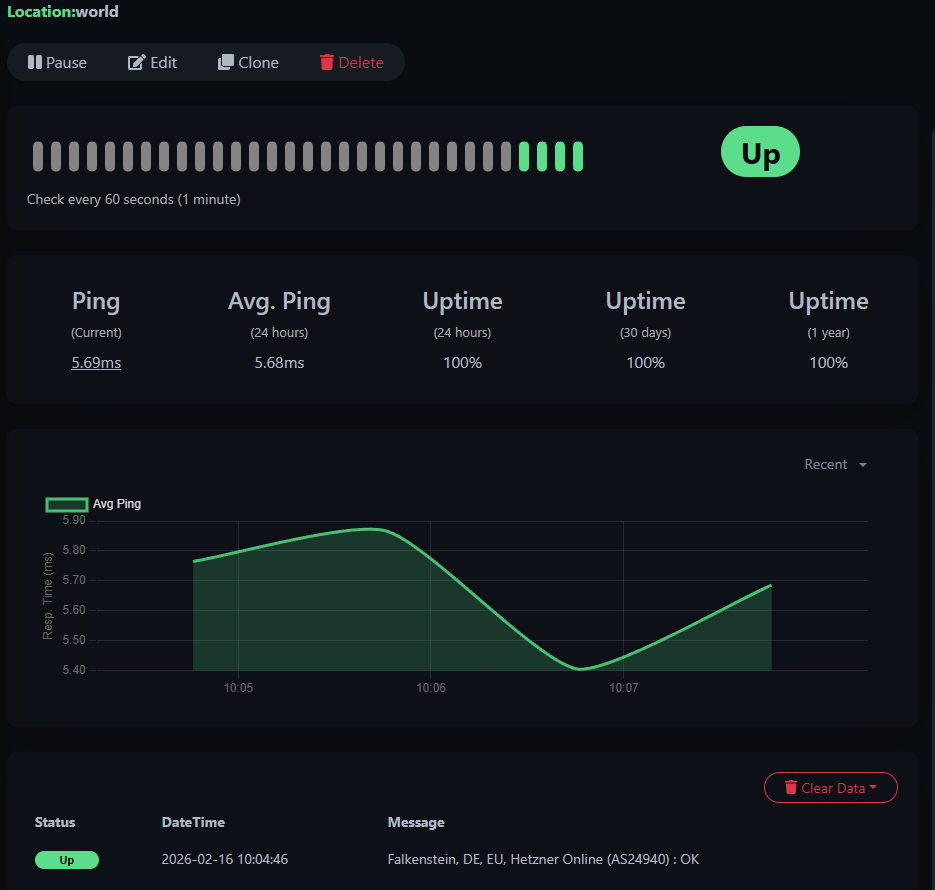
On the monitor page, you can see that the Globalping API selected a random probe and that results are now coming in (depending on the monitoring interval you selected; in our case, one minute).
About the Globalping “location” field
You can fine-tune probe selection and tell Globalping where you want to monitor from. You can provide locations such as continents, countries, cities, ASNs, networks, and network types. To learn more about defining locations, check our GitHub README.
You can also create filters using the plus character to fine-tune probe selection. For example, comcast+california returns a probe on the Comcast network in California.
Here are some considerations when choosing a location for uptime monitoring:
- Using the default world location should be sufficient for most use cases, but if latency is an important metric for you, we recommend providing fine-grained locations to avoid large latency variations.
- When you target regions or countries, such as Germany or South America, we recommend you add the
+datacenter-networkfilter (for example,Germany+datacenter-network). This ensures the picked probes run on stable infrastructure rather than eyeball network probes that may be slow or too far from the server you’re monitoring. - Be aware that some countries implement strict IP and domain filtering. If you encounter regional connectivity issues, use specific location filters to bypass or isolate those areas.
About Globalping API rate limits
By default, you can run 250 free tests per hour per IP address. If you only use Globalping for three or four Uptime Kuma monitors, you likely won’t exceed this limit. Keep in mind that all other Globalping API usage from the same IP address also counts toward this limit.
If you want to increase your rate limit to 500 free tests per hour, you only need to sign up for the free Globalping Dashboard and connect it to your Uptime Kuma. This associates your API usage with your dashboard account instead of your IP address.
Here’s how to increase your rate limits:
- Go to dash.globalping.io and sign up for a free account.
- Navigate to “Tokens” and click “Generate a new token”.
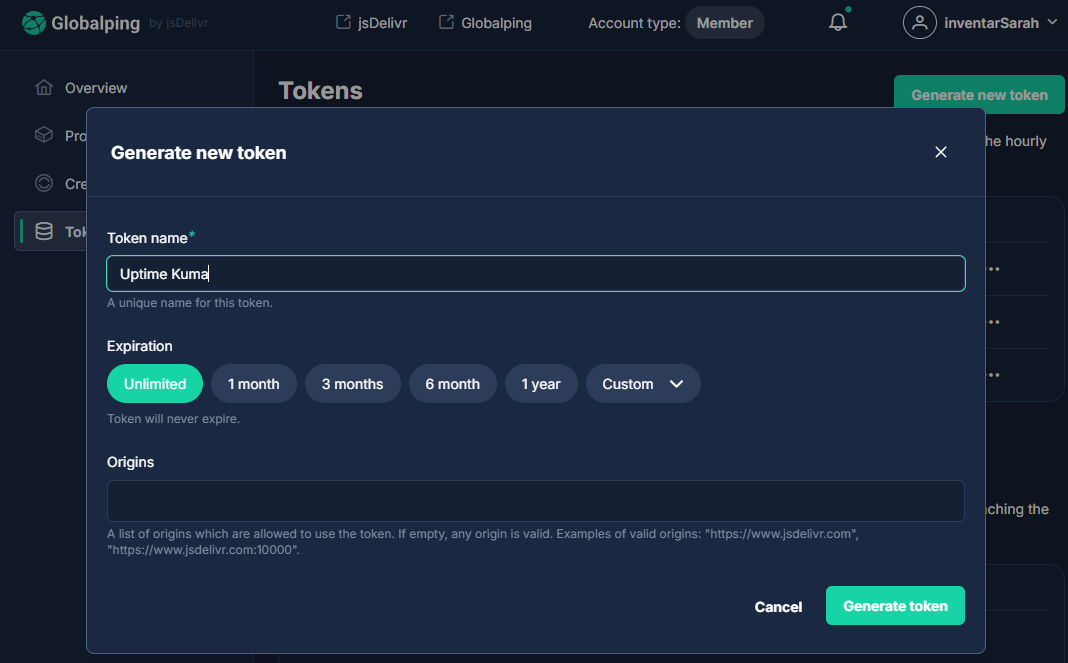
- Copy the token immediately because you won’t be able to view it again.
- Go to your Uptime Kuma dashboard.
- Navigate to “Settings” and find the “About” section.
- Paste your token into the “Globalping API token” field.
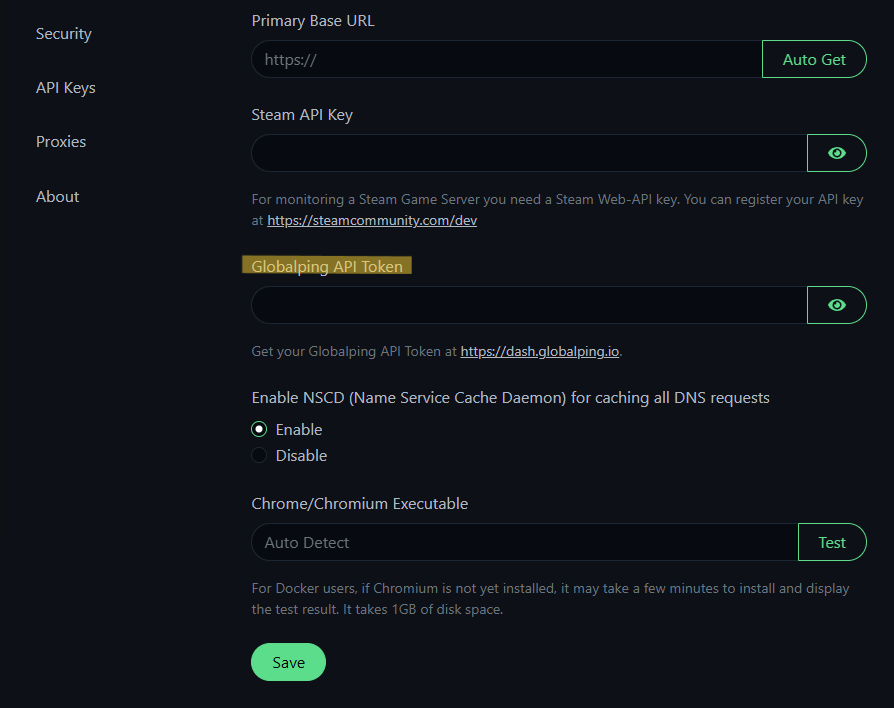
- Save your changes, and enjoy increased rate limits.
In case the rate limits are still not enough, you can earn credits in the dashboard to spend on additional tests, for example, by hosting a probe for the Globalping network. If that’s something you’re interested in, you can read more about how hosting a probe works in this blog post.
Example configurations
Finally, let’s look at two examples to showcase what’s possible.
Verify API availability from a specific region
Let’s say you run a public API and recently received reports from users in East Asia that requests occasionally time out. And because you run Uptime Kuma on a server in Europe, you haven’t noticed any issues.
To check whether the problem is regional, you can create a Globalping monitor that runs HTTP checks from East Asia.
Here’s how we configure the monitor in Uptime Kuma:
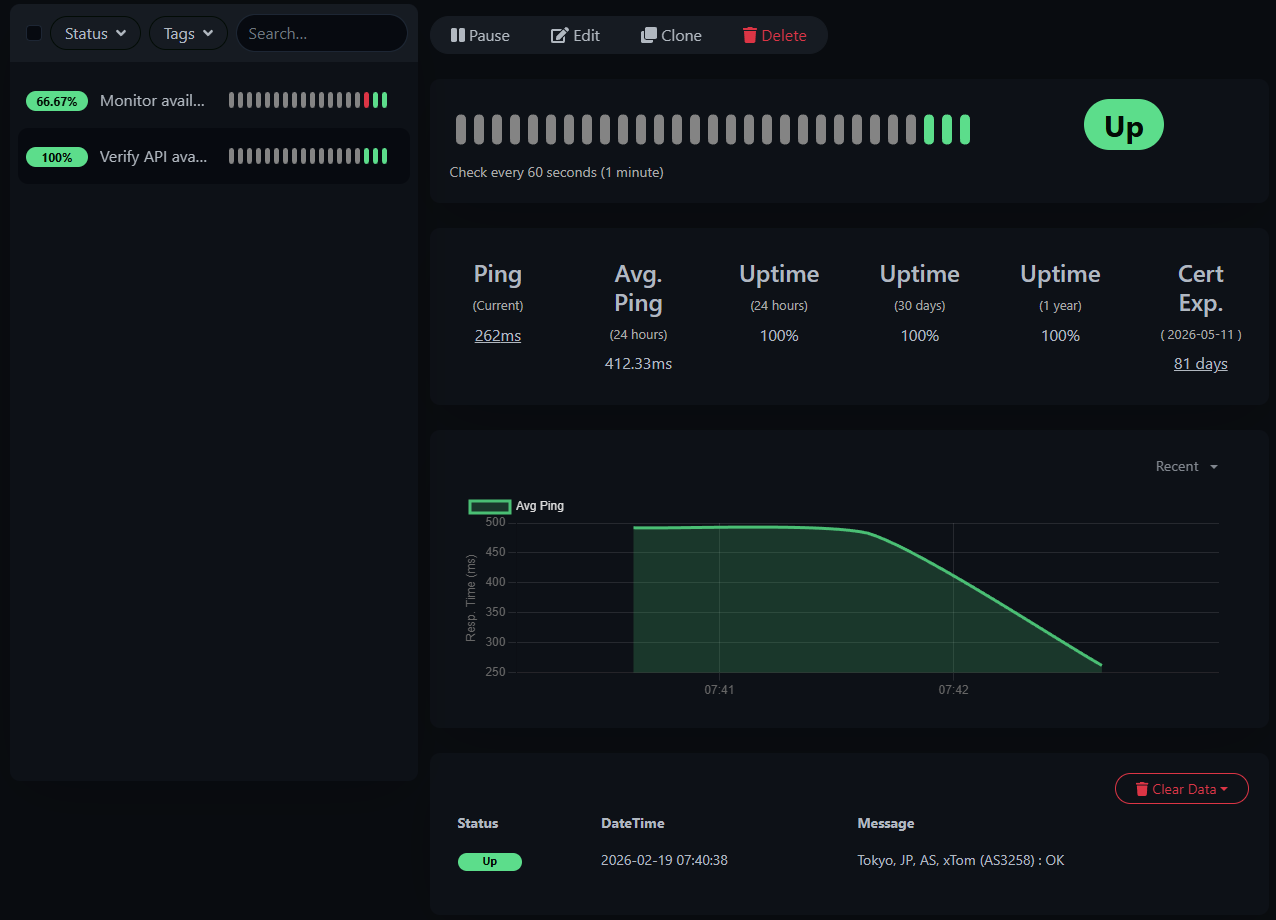
We selected “HTTP” as the monitor subtype and entered the API’s URL as the hostname. For the location, we specified east asia. And remember, this will include home-hosted probes that could be seen as unreliable. Unless you specifically need to use eyeball locations, it is recommended that you instead specify east asia+datacenter-network.
Once saved, Uptime Kuma begins collecting latency and uptime data from that location. If the availability is different from what you see in your Europe-based monitor, you’ll immediately notice it in the monitor history and graph.
Monitor availability from a specific ISP
Now let’s look at a network-specific example.
Imagine users on a particular ISP report that your website sometimes loads slowly or fails to connect. Instead of guessing whether the issue is ISP-related, you can monitor directly from that network.
Here’s how we configure the monitor:
We selected “ping” with TCP as the protocol to verify port-level reachability. For the location, we defined a filter such as comcast+california. This instructs Globalping to select a probe on that ISP within the specified region.
After saving the monitor, Uptime Kuma begins collecting uptime and latency data from that specific network. If the issue only affects that ISP, you’ll be able to confirm it.
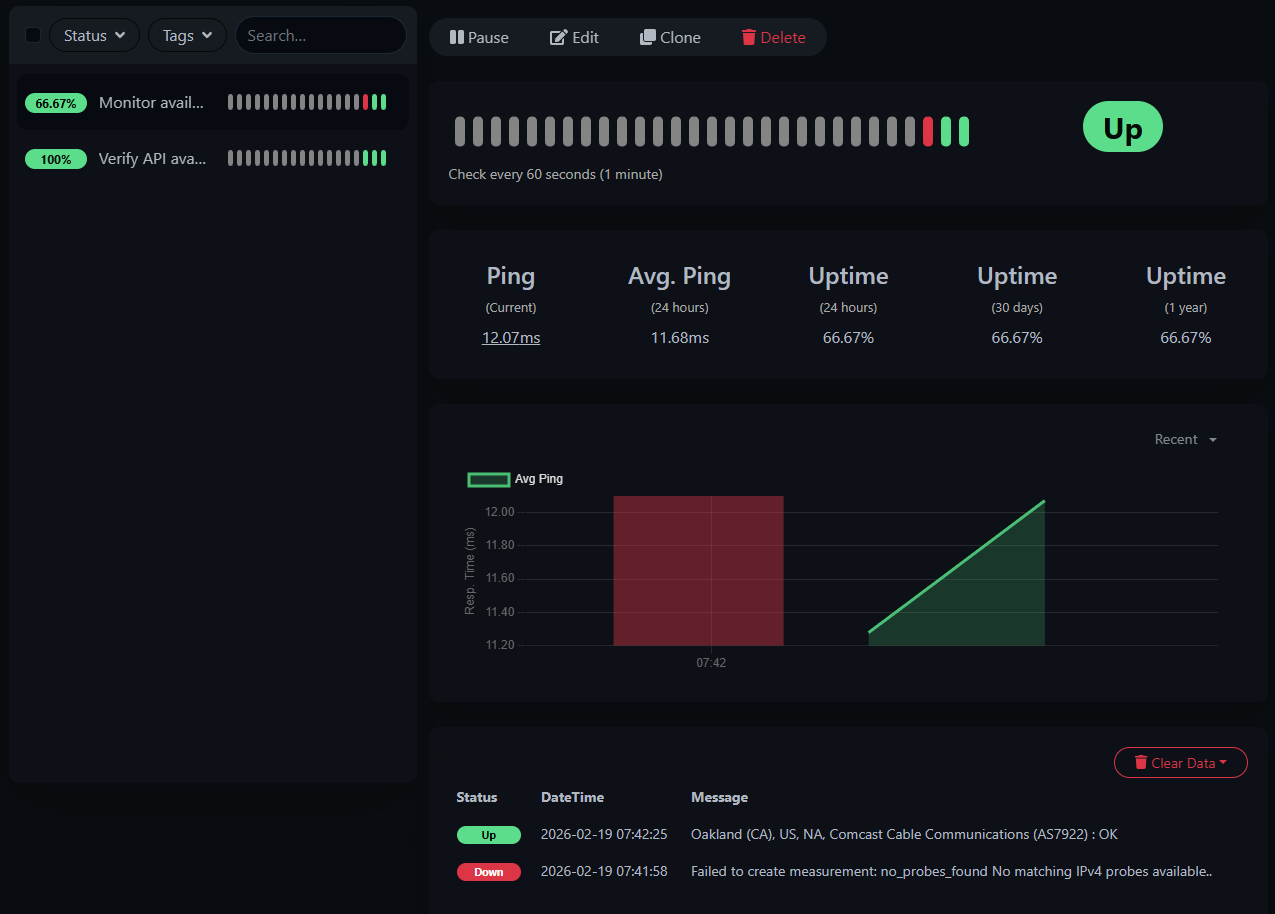
You can also see in this screenshot that the tool displays an error because we first defined a location with no available probes.
Verify DNS resolution from a specific location
Finally, let’s look at a DNS-related example.
Imagine you just migrated your website to a new server and updated your DNS records. While everything resolves correctly for your location, some users report that they are still being directed to the old IP address.
Instead of waiting and guessing whether DNS propagation has completed, you can set up a monitor with Globalping DNS for specific regions.
Here’s how we configure the monitor:
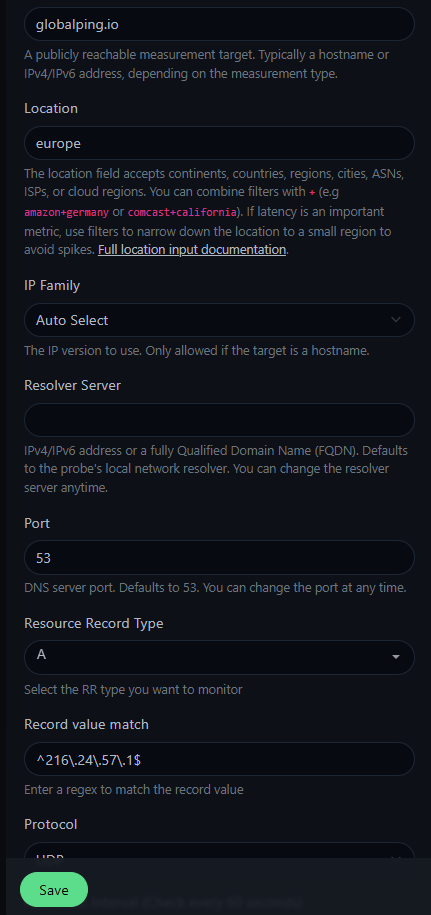
We picked DNS as the monitor subtype and entered our domain name as the hostname. We then selected “A” for the resource record type and defined a record value match with the new IP address to make sure the correct server is returned.
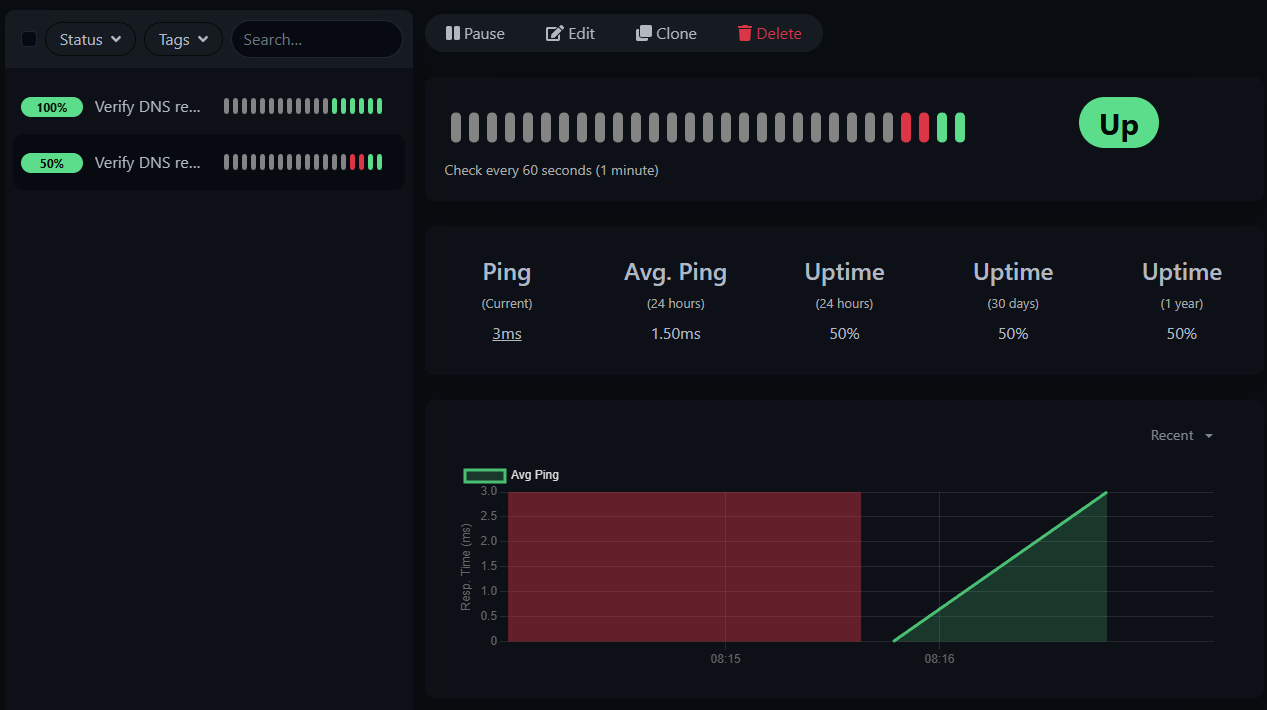
Once started, the Uptime Kuma and Globalping check whether the domain resolves to the expected IP address from the defined region. If a probe receives the old record, the monitor fails. As soon as it turns green, you know that resolvers in that region are returning the updated record.
Conclusion
Combining Globalping with Uptime Kuma is a great way to elevate your monitoring in a self-hosted, open-source environment. You can create as many monitors as you need and monitor from virtually any location without deploying additional infrastructure.
If you’re not yet using Uptime Kuma and are looking for a flexible monitoring solution, we encourage you to give it a try and explore the demo.